How to Make a Triple Chocolate Mousse Cake at Home (Step-by-Step Guide)
There’s something magical about a dessert that feels like pure comfort the moment you look at it. When you slice into a Triple Chocolate Mousse Cake, you’re not just cutting into layers—you’re stepping into a moment of indulgence that you created with your own hands. Maybe you’re celebrating something special, or maybe you just want to treat yourself after a long week. Whatever the reason, this cake has a way of turning your kitchen into your favorite place and your table into a small celebration.
If you’ve ever believed that impressive desserts only come from professional bakeries, you’re about to prove yourself wrong. This guide walks you through every single step in a way that makes the process surprisingly simple—even if you’ve never made mousse before. By the end of this, you’ll have a dessert that looks elegant but feels warm, inviting, and completely achievable.
Table of Contents
Why Triple Chocolate Mousse Cake Is Worth Making at Home
When you make this dessert yourself, you get more than just flavor. You gain control over the texture, the balance of sweetness, and the richness of each layer. The combination of dark, milk, and white chocolate brings a harmony of tastes that store-bought versions rarely match.
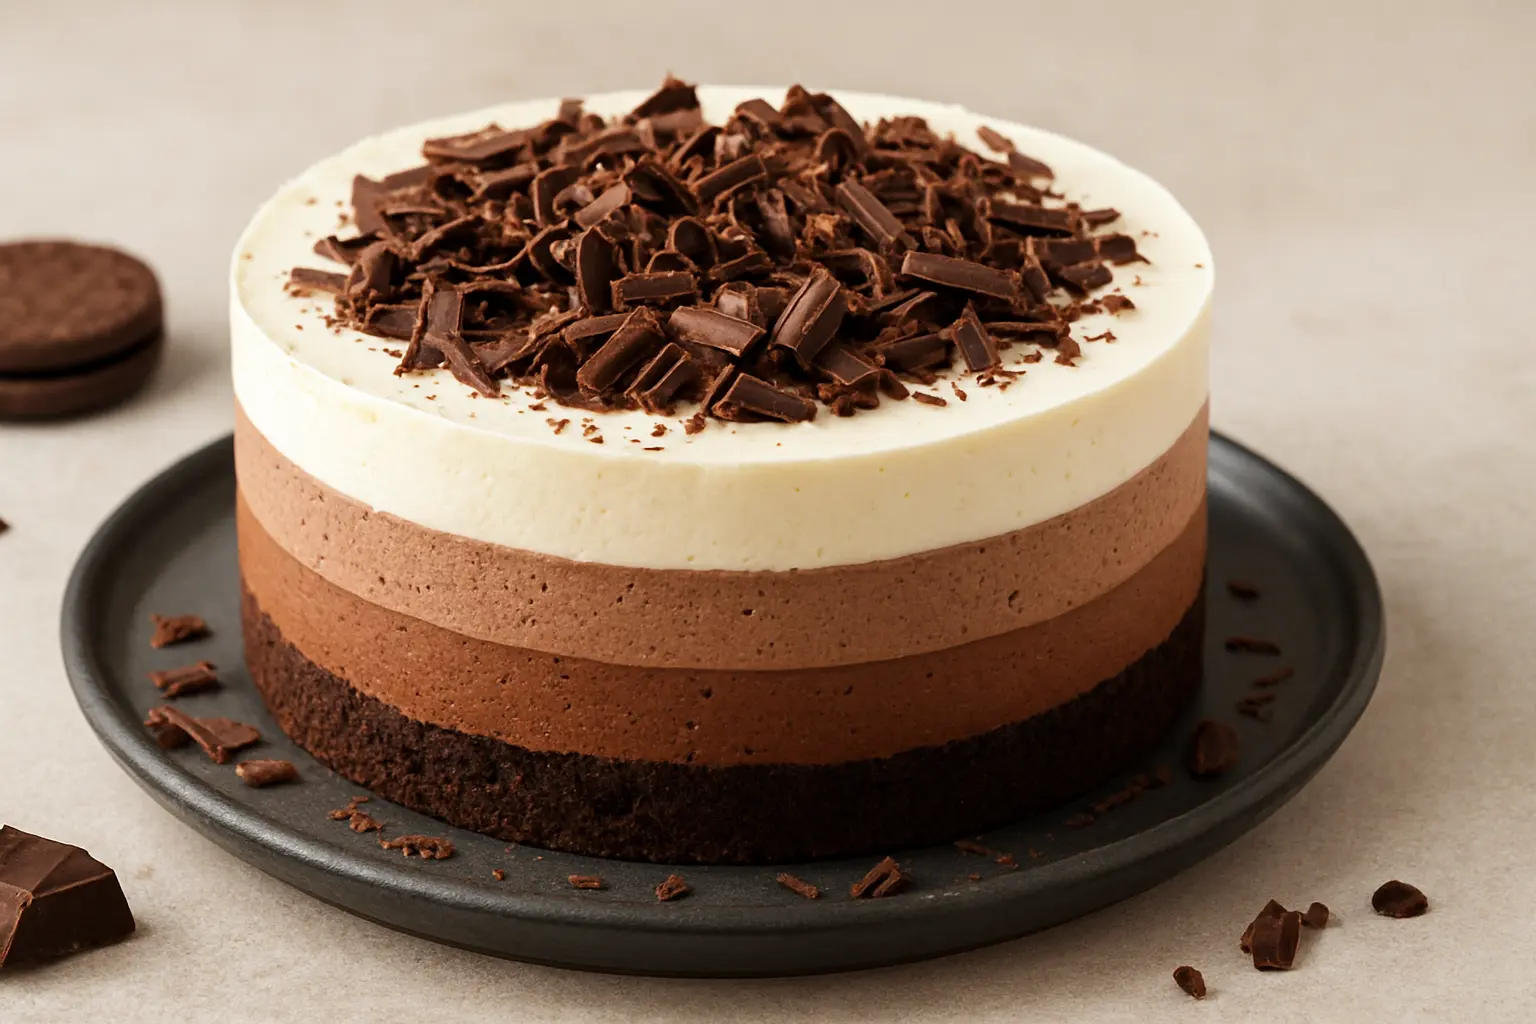
The Layers That Make This Cake a Standout
Each layer brings something different:
- Dark chocolate gives you that deep, bold punch.
- Milk chocolate softens the intensity with smooth sweetness.
- White chocolate finishes everything with a creamy, melting touch.
Together, these three layers create a dessert that feels luxurious without being complicated.
The Process Is Easier Than You Think
You don’t need:
- fancy equipment
- years of baking experience
- complicated cooking techniques
All you need is patience, good chocolate, and a desire to create something special.
Ingredients You Need for Triple Chocolate Mousse Cake
To keep everything simple, here are the ingredients broken down by layers.
Chocolate Biscuit Base
| Ingredient | Quantity |
|---|---|
| Chocolate biscuits or Oreo cookies | 250 g |
| Melted butter | 6 tbsp |
Dark Chocolate Mousse
| Ingredient | Quantity |
|---|---|
| Dark chocolate | 150 g |
| Heavy cream | 1 cup |
| Gelatin powder | 1 tsp |
| Water (to bloom gelatin) | 2 tbsp |
Milk Chocolate Mousse
| Ingredient | Quantity |
|---|---|
| Milk chocolate | 150 g |
| Heavy cream | 1 cup |
| Gelatin powder | 1 tsp |
| Water | 2 tbsp |
White Chocolate Mousse
| Ingredient | Quantity |
|---|---|
| White chocolate | 150 g |
| Heavy cream | 1 cup |
| Gelatin powder | 1 tsp |
| Water | 2 tbsp |
How to Make a Triple Chocolate Mousse Cake at Home (Step-by-Step Guide)
Step 1 — Build the Base
This is the foundation of your cake, and it sets the tone for the texture.
- Crush your biscuits finely until they resemble sand.
- Mix them with melted butter until they hold shape when pressed.
- Press the mixture into the bottom of your springform pan.
- Chill it for about 15 minutes to firm up.
You’ve already completed the first layer—and it didn’t take more than a few minutes.
Step 2 — Create the Dark Chocolate Mousse Layer
How to Make It Smooth and Velvety
- Melt the dark chocolate slowly so it doesn’t burn.
- Whip the cream until it reaches soft peaks.
- Bloom the gelatin by mixing it with water and letting it sit.
- Heat the gelatin gently so it dissolves completely.
- Combine the chocolate, cream, and gelatin with a gentle folding motion.
- Pour the mixture over the chilled base and let it firm slightly in the fridge.
The dark chocolate layer becomes the boldest part of the cake, so take your time with it.
Step 3 — Build the Milk Chocolate Mousse Layer
This middle layer adds balance and softness.
- Melt the milk chocolate.
- Whip your cream once again.
- Prepare the gelatin the same way you did before.
- Blend everything together slowly.
- Pour it over the dark chocolate and chill again.
You’ll start to see your cake gaining height and elegance at this point.
Step 4 — Finish With the White Chocolate Mousse Layer
This top layer adds visual contrast and a creamy ending.
- Melt the white chocolate carefully; it burns easily.
- Whip the cream only until it reaches a light, airy texture.
- Add the gelatin mixture.
- Fold everything gently so you don’t lose volume.
- Pour onto your milk chocolate layer.
- Let the entire cake chill for at least 3–4 hours.
This final step transforms the cake from a project into a dessert worth showing off.
Tips for Perfecting Your Triple Chocolate Mousse Cake
Keep the Layers Separate and Clean
To prevent mixing:
- Allow each layer to set slightly before adding the next.
- Pour slowly and use a spatula to guide the flow.
Choose the Right Chocolate
Your chocolate choice determines your flavor.
- Use 60–70% dark chocolate for depth.
- Choose a high-quality white chocolate so the top layer stays smooth.
Avoid Over-Whipping Cream
Cream that’s too stiff makes mousse grainy. Aim for soft, gentle peaks.
Serving Your Triple Chocolate Mousse Cake
When You’re Ready to Slice
- Dip your knife in hot water for clean cuts.
- Wipe the blade between slices.
- Add toppings like chocolate curls, berries, or cocoa dust.
Storing the Cake
- Store in the fridge for up to 4 days.
- Freeze for longer storage (up to 1 month), wrapped tightly.
FAQs About Triple Chocolate Mousse Cake
Can I make Triple Chocolate Mousse Cake without gelatin?
Yes, but you need a substitute. Agar-agar works, though it sets more firmly, so use half the amount.
Why didn’t my Triple Chocolate Mousse Cake set properly?
The most common issues are:
- not chilling enough
- incorrect gelatin measurements
- chocolate that was too hot when combined with cream
Can I make this cake the day before serving?
Definitely. In fact, the flavor improves after resting overnight.
Can I make this with only one or two chocolate layers?
Yes—you can simplify it. But the classic Triple Chocolate Mousse Cake experience comes from the blend of all three.
Conclusion
Making a Triple Chocolate Mousse Cake at home allows you to bring together rich flavors, elegant layers, and the satisfaction of creating a show-stopping dessert with your own hands. You don’t need special skills or advanced baking knowledge—just patience, good ingredients, and the willingness to enjoy the process. By following this guide step by step, you’ll end up with a stunning cake that not only tastes incredible but also feels rewarding to make.
If you’re ready to impress your guests, treat your family, or simply spoil yourself with something decadent, this cake is the perfect place to start.
Call to Action
If you enjoyed this recipe guide and want more rich, step-by-step dessert tutorials, make sure you save this page, share it with someone who loves chocolate as much as you do, and explore more of our dessert creations. Your next favorite recipe might be just a click away!
There are no reviews yet. Be the first one to write one.