How to Make Easy Red Velvet Snowball Cookies at Home
Imagine walking into your kitchen on a chilly afternoon, greeted by the scent of warm vanilla, cocoa, and sweet powdered sugar wafting through the air. You glance at a tray of freshly baked red velvet snowball cookies—tiny, round bites of joy that melt the moment they touch your tongue. Making these Easy Red Velvet Snowball Cookies at home isn’t just about baking; it’s about creating a moment you’ll remember, a little piece of comfort that brightens your day.
These cookies capture everything you love about the holidays—color, flavor, and that soft, melt-in-your-mouth texture that makes every bite irresistible. Whether you’re a seasoned baker or someone who’s just getting started, you’re about to discover how surprisingly simple it is to make these cookies from scratch.
Table of Contents
What Makes Easy Red Velvet Snowball Cookies So Special?
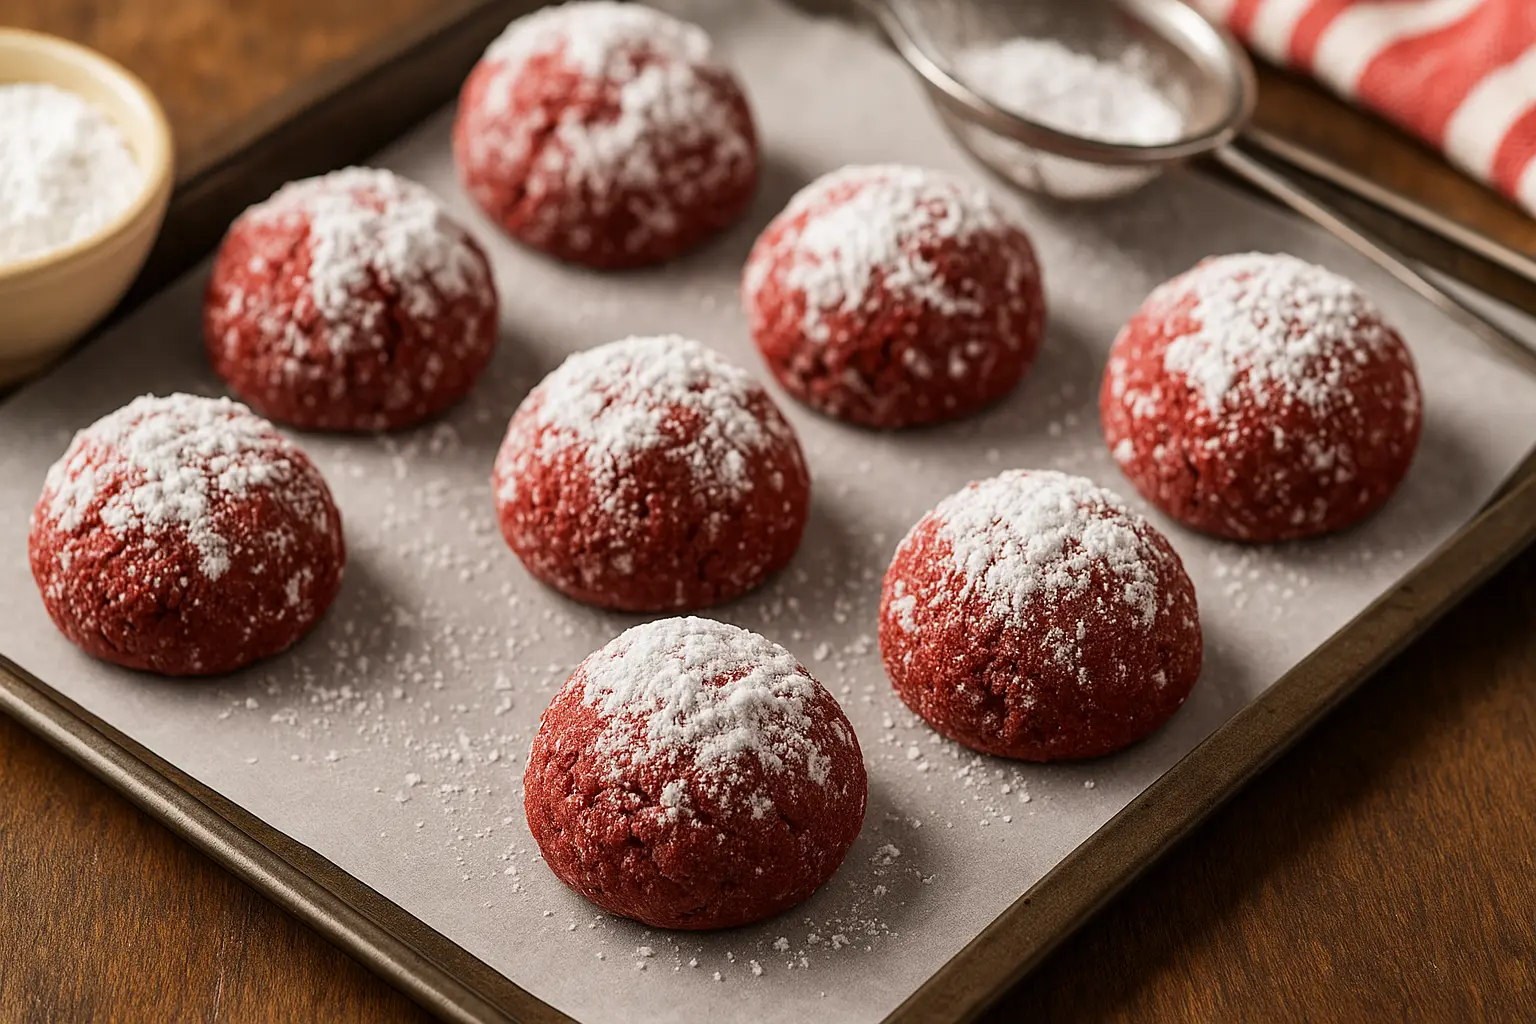
There’s something magical about Easy Red Velvet Snowball Cookies that makes them stand out from other treats. Their deep red hue, powdered sugar coating, and buttery finish make them the ultimate holiday showstopper. But beyond their appearance, it’s their texture that really wins you over.
You’ll love how they’re slightly crisp on the outside yet soft and airy inside—almost like a red velvet truffle in cookie form. Each bite balances cocoa richness with buttery sweetness, and that delicate “snowy” coating adds the final festive touch.
These cookies are perfect for:
- Holiday dessert tables
- Valentine’s Day surprises
- Gifting to friends and family
- Or just enjoying with a cup of coffee on a cozy weekend
The best part? You can make them in under 30 minutes with ingredients you probably already have.
Essential Ingredients for Easy Red Velvet Snowball Cookies
Let’s start by gathering what you’ll need. Each ingredient plays an important role in achieving that soft, crumbly texture and iconic red color.
| Ingredient | Quantity | Purpose / Notes |
|---|---|---|
| Unsalted butter | 1 cup (softened) | Adds moisture and richness |
| Powdered sugar | ½ cup (plus extra for coating) | Sweetens and creates the snowy effect |
| Red food coloring | 1–2 teaspoons | Gives the signature red velvet tone |
| Vanilla extract | 1 teaspoon | Enhances flavor depth |
| All-purpose flour | 2 ¼ cups | Builds the cookie’s structure |
| Cocoa powder | 2 tablespoons | Adds the classic red velvet flavor |
| Cornstarch | 1 tablespoon | Helps the cookies stay soft and tender |
| Salt | ¼ teaspoon | Balances sweetness and enhances flavor |
🧑🍳 Tip: If you prefer a natural color, use beetroot powder instead of food dye—it offers a lovely red hue without affecting flavor.
Step-by-Step Guide to Making Easy Red Velvet Snowball Cookies at Home
You’re only a few steps away from creating the perfect batch of cookies. Here’s how you can make them effortlessly:
Step 1 – Prepare Your Ingredients and Preheat the Oven
Before you start mixing, preheat your oven to 350°F (175°C). Line a baking sheet with parchment paper to ensure even baking and easy cleanup later.
Soften your butter ahead of time—it should feel slightly cool but easily yield to pressure. This helps create that fluffy, crumbly texture.
In a large bowl, cream together the butter and powdered sugar until it’s light and airy. This process traps air, giving your cookies a delicate, melt-in-your-mouth structure.
Step 2 – Mix the Red Velvet Dough
Add vanilla extract and a few drops of red food coloring to the butter mixture. The vibrant color will set the festive tone for your cookies.
In a separate bowl, whisk together flour, cocoa powder, cornstarch, and salt. Gradually mix the dry ingredients into the butter mixture, stirring until everything is well combined. The dough should be soft but not sticky—smooth enough to roll easily.
If the color isn’t as rich as you’d like, you can add an extra drop of food coloring here. Don’t worry—it won’t affect the flavor.
Step 3 – Shape and Bake the Cookies
Using your hands or a small cookie scoop, form the dough into 1-inch balls. Place them about an inch apart on the baking sheet.
Bake for 10–12 minutes or until the bottoms are just set. The tops shouldn’t brown—these cookies are meant to stay soft and tender. Once baked, allow them to cool on the tray for about five minutes.
Step 4 – Cool and Roll in Powdered Sugar
While they’re still slightly warm, gently roll each cookie in powdered sugar. Set them on a cooling rack and let them rest completely before rolling them in sugar again for that perfect snowy look.
Quick Baking Tips:
- Use gel food coloring for a deep red hue without watering down the dough.
- Don’t overbake—these cookies are meant to stay tender.
- For a professional finish, sift your powdered sugar before coating.
Pro Tips for Perfect Easy Red Velvet Snowball Cookies
You might think baking is about precision, but a few small tweaks can make your cookies truly exceptional.
Baking Tips for Beginners
- Always measure ingredients accurately.
- Use room-temperature butter for easy mixing.
- Chill the dough for 10–15 minutes if it feels too soft to roll.
Ingredient Substitutions
If you’re baking for specific dietary needs, here’s how you can adapt:
- Gluten-Free: Use a 1:1 gluten-free flour blend.
- Dairy-Free: Substitute butter with plant-based alternatives like coconut oil or vegan butter.
- Natural Coloring: Try beetroot powder or pomegranate juice for color without dyes.
Presentation & Gifting Ideas
When cooled, package your cookies in festive tins, mason jars, or cellophane bags tied with ribbons. Add a handwritten note for a personal touch—it’s a small detail that turns a simple gift into something heartfelt.
Common Mistakes to Avoid When Baking Red Velvet Snowball Cookies
Even the easiest recipes can go wrong with small missteps. Here’s what to watch out for:
- Overmixing the dough: Leads to dense, tough cookies.
- Skipping cornstarch: Removes that melt-in-your-mouth texture.
- Rolling while hot: The powdered sugar will melt and clump.
- Not chilling the dough (if too warm): Causes cookies to spread too much.
Being patient is key. Letting the dough rest and cool at the right times makes all the difference.
Storage and Shelf Life
To keep your Easy Red Velvet Snowball Cookies soft and fresh, store them correctly using the chart below:
| Storage Method | Duration | Best Practice |
|---|---|---|
| Room Temperature | 5–7 days | Keep in an airtight container |
| Refrigerator | 2 weeks | Separate layers with wax paper |
| Freezer (unbaked dough) | 3 months | Store in zip bags; bake directly from frozen |
💡 Tip: If you plan to freeze baked cookies, double-wrap them to prevent freezer burn.
Variations of Easy Red Velvet Snowball Cookies
Want to make these cookies even more exciting? Try one of these variations:
- Cream Cheese Filling: Add a soft cream cheese center before baking.
- White Chocolate Drizzle: Drizzle melted white chocolate on top after cooling.
- Chocolate Chip Twist: Fold in mini white chocolate chips for extra flavor.
- Nutty Version: Mix in finely chopped pecans or walnuts for a crunchy texture.
These small changes can completely transform your batch while keeping that signature red velvet charm.
Pairing Ideas
Pair your freshly baked cookies with:
- A warm mug of hot cocoa topped with marshmallows.
- A cappuccino or black coffee to balance the sweetness.
- Vanilla or peppermint ice cream for an indulgent dessert combo.
Nutrition Information (Approximate per cookie)
| Nutrient | Amount |
|---|---|
| Calories | 110 kcal |
| Fat | 6g |
| Carbs | 13g |
| Protein | 1g |
| Sugar | 7g |
(Nutrition values may vary based on specific brands and substitutions.)
FAQs About Easy Red Velvet Snowball Cookies
1. Can I make Easy Red Velvet Snowball Cookies ahead of time?
Yes! You can refrigerate the dough for up to two days or freeze it for later. Bake straight from frozen—just add a few extra minutes.
2. Why did my cookies flatten?
That usually happens if your dough was too warm or didn’t have enough flour. Chill the dough slightly before baking.
3. Can I use natural food coloring?
Definitely. Beetroot powder or pomegranate concentrate adds a lovely red hue without artificial dyes.
4. How do I prevent the powdered sugar from melting?
Cool cookies completely before rolling them, and dust them again once cooled for a lasting snowy finish.
5. Are these cookies freezer-friendly?
Absolutely! Store baked cookies in airtight containers and thaw at room temperature when ready to enjoy.
6. Can I use gluten-free flour?
Yes, a good quality 1:1 gluten-free blend works perfectly for this recipe.
Conclusion
By now, you know exactly how to make Easy Red Velvet Snowball Cookies that look as beautiful as they taste. You’ve learned the secrets behind their rich color, soft texture, and sweet, snowy coating—and all without needing fancy tools or techniques.
These cookies aren’t just treats; they’re memories in the making. Each batch brings a sense of warmth, celebration, and love into your home. So, the next time you’re craving something festive and sweet, don’t wait for the holidays—grab your mixing bowl and bake a little happiness today.